Creating Plug and Play Modules for OpenCms
Contents |
Abstract
This document explains in brief how to create reusable, template-independent modules for OpenCms 8.0.1 or later.
Developing Web-Projects in general
There are two approaches to develop Web-Projects in general:
- "Tight coupling"
- You can develop a single Module encapsulating everything you need for your Web-Project
- This Module will only work in your concrete project
- "Loose coupling"
- You can develop generic Modules realizing a single requirement inside your Web-Project
- Those modules can than reused in other projects
- Example: One Module for one Content-Type
OpenCms Modules v7 vs. v8
- Version 7 with Template 2 and Web-Form
- Modification necessary:
- Adapt the Web-Form-Module itself
- Adapt your Website-Template
![]() Module-Update needs adoption of your Web-Project
Module-Update needs adoption of your Web-Project
- Version 8 with Template 3 and Web-Form
- Ready to use:
- Adapting Web-Form not necessary
- Adapting Website-Template not necessary
![]() Module update without any problem
Module update without any problem
The module structure
Imagine you want to create a "plug & play" module that defines only one resource type. Lets call the module "mymodule" and the module's resource type "my_content"
Create a new module
In the workplace go to the root site ( "/" ) and switch to the Administration View. Click on "Module Management" and there click on the "New Module" icon. To create a new module you have to fill in all necessary data in the opening form "New Module":
- Module information
- Package name: Enter the package name of the module here. The package name structure must follow the java package structure (e.g. com.alkacon.opencms.v8.mymodule). (requierd)
- Module name: Here you can enter the nice name of the module here. (required)
- Module Description: Enter the description of the module here.
- Module version: Here you can enter the module version. When creating a new model, this field gets pre-filled with a initial module version number starting at 0.1. This number gets incremented (position after decimal point) every time, the module gets exported.
- Module group: The module group is used to group modules together.
- Action class: The action class is called when the module is initialized or modified.
- Author information
- Author name: Enter the name of the module creator.
- Author email: Enter the email address of the module creator.
- Module folders
- Create Modulefolder: Check this box to create the modulefolder at '/system/modules/'. Adds the modulefolder to the module resources.
- Create templates subfolder: Check this box to create the '/templates/' subfolder. Required to store templates in the module.
- Create elements subfolder: Check this box to create the '/elements/' subfolder. Required to store elements in the module.
- Create formatters subfolder: Check this box to create the '/formatters/' subfolder. Required to store formatters in the module.
- Create resources subfolder: Check this box to create the '/resources/' subfolder. Required to store additional resources (css or javascript) in the module.
- Create schemas subfolder: Check this box to create the '/schemas/' subfolder. Required to store XSD files for user defined XML content resource types.
- Create classes subfolder: Check this box to create the '/classes/' subfolder tree. Required to store and export locale bundles, classes or other property files in the module. Adds the '/classes/' folder to the exportpoints.
After you filled out all that information click on "OK" and the module and its tree structure get created automatically.
A detailed description how to create a new module can be found here.
Create module configuration .config
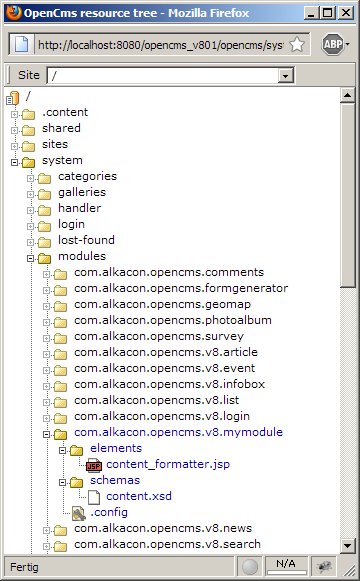
Next switch to the "Explorer" View in your workplace. In the Explorer go to the newly created folder structure of the module at /system/modules/com.alkacon.opencms.v8.mymodule.
In the workplace's tool bar click on the "New" wizard icon. From the opening dialog with a list of available new resource types choose "Other options" and click continue. In the next window select "Module configuration" and click continue. Name the Module configuration file .config and uncheck the 'Edit properties of the new file' and 'Append ".html" suffix to name' option and then click "Finish".
Create XSD
Change to the module's "schemas" subfolder. In the workplace's tool bar click on the "New" wizard icon. From the opening window with all selectable resource types choose the "Text file" and click continue. In the dialog "Create a new Text file" give a proper name, let' say "content.xsd". Since this is for demo purpose, the properties of the new file do not need to be edited, so uncheck the "Edit properties of the new file" checkbox and click on "Finish".
A detailed description of how to create a XML schema definition cann be found here.
Create formatter JSP
For OpenCms 8 you have to define a formatter within your XSD, too.
After you created your XSD in the '/schemas/' subfolder switch to the module's '/formatters/' subfolder. Click on the workplace's "New" wizard icon and select "JSP" as new resource type. Choose a proper name like "content_formatter.jsp" in our given scenario. This JSP has to be associated with the module's XSD as described here and will be used to render the content.
Summary
By now your module should have the following folder structure…
The module in detail
Sitemap configuration
The sitemap configuration is a new resource type shipped with OpenCms 8 by default. The main function of that file is to define the resource types that are available in the container page editor and ADE's "Add wizard". Typically this file is stored below the Site e.g. /sites/default/.content/.config
For creating a "plug & play" module we create a file of the resource type "module configuration" in the module folder and name it .config as described above.
Sitemap configurations can rely inside the Module or inside a Sitemap. That makes it possible to configure a default behavior for a fresh module installation by a predefined Module configuration .config file.
When the "container page editor" tries to determine which configuration to take, it looks inside the module and in the Sitemap. If the "container page editor" finds a configuration on both locations the Sitemap is stronger. If both are present and the module's resource type is configured in the central Sitemap configuration, too, the Sitemap configuration overwrites the Module configuration.
Read more on Configuration of OpenCms Sitemap Properties
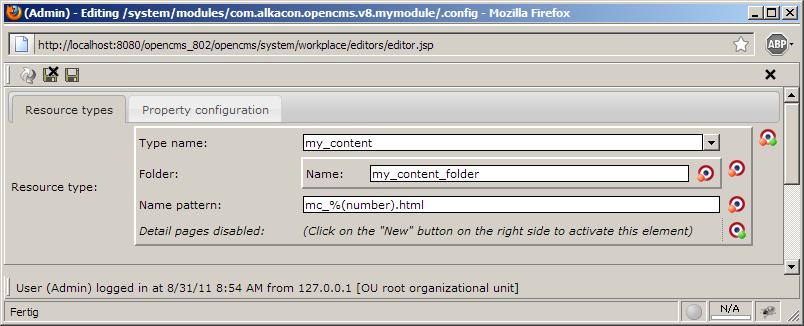
- Tab "Resource types"
- The field "Type name" holds the name of the new resource type as displayed in the ADE "add wizard".
- The field "Folder" defines the default folder, where files of this resource type get stored. Options are:
- Name: Defines a folder of this name in the /sites/default/.content/ path. Is created automatically if non-existing.
- Path: Alternatively here you can enter the full path (e.g. /sites/default/.content/my_content_folder).
- The field "Name pattern" defines the file pattern. That tells the container page editor which filename to use for new contents.
- The checkbox "Detail pages disabled": If checked no detail page will be created. Useful especially for Group Containers.
Formatters as key technique
The formatter's concept is the key technique for creating "plug & play" modules. Formatters can be configured for each resource-type. This is typically done in the XSD.
The new configuration allows to specify attributes that tell the formatter into which container it fits:
- uri: The path to the formatter JSP
- type: specifies the type of the container the formatter is compatible with
- minwidth: The minimum width the container must have to hold the formatter
- maxwidth: The maximum width the container must have to hold the formatter
Define a formatter:
[…]
 <xsd:annotation>
  <xsd:appinfo>
   […]
   <formatters>
    <formatter uri="/path/to/JSP" type="*" minwidth="100" maxwidth="500“ />
   </formatters>
   […]
  </xsd:appinfo>
 </xsd:annotation>
[…]
By setting the type to “*” the formatter can be used for each container. The attributes minwidth and maxwidth restrict this formatter to be used in containers whose width is in-between.
A JSP that uses the <cms:formatter>-tag can access the configured width of the container and can then change the presentation of a content dynamically depending on the destination container.
That makes it possible to create formatters without any knowledge of the template.
<%@page buffer="none" session="false" taglibs="c,cms“%>
 <cms:formatter var="content" val="value">
  <div class="view-article">
   <h2>${value.Title}</h2>
   <div class="paragraph">
    <c:set var="imgwidth">
     ${((cms.container.width) / 2) -25}
    </c:set>
    <cms:img src="${value.Image}" width="${imgwidth}"/>
    ${value.Text}
   </div>
  </div>
 </cms:formatter>
In spite of the power of formatters it can happen that you use a third party module that won‘t work with your template. In that case it is possible to write and configure your own formatter without changing the third party module. Advantage: You can update the third party module without changes.
Read more on Using formatters in OpenCms 8
Step-by-step module creation
- Create a module with the OpenCms workplace as usual
- Create the folder structure inside the module
- Create a XSD schema for the content you want to offer with your module
- Configure the resource type and the explorer type as usual in the opencms-modules.xml
- Create a formatter that renders the content
- Add the formatter to the XSD of your content
- Create a Module configuration file .config with the help of the new wizard of OpenCms Workplace (can be found under >>Other options)
- Edit the Module configuration and set in the field "Type name" and "Folder"
- Set in the field "Pattern" the pattern you want to have for new files (e.g. mc_%(number).html)
You may try this generator to create your own templates based on the V8-Demo-Templates.

